Digital Signal |
| All signals in the computer are stored and processed in digital format. However, the signals received at the input of the audio card are analog. In order to be able to process these signals by the computers, they must be converted from analog to digital using the Analog to Digital Converter (ADC.) Todas las señales en la computadora son almacenadas y procesadas en forma digital. Sin embargo, las señales que se reciben en el puerto de entrada de la tarjeta de audio son analógicas. Para que la computadora pueda procesar señales desde el puerto de entrada es necesario convertir estas señales analógicas a señales digitales utilizando el convertidor de analógico a digital de la computadora (ADC). |
PCM |
| Pulse Code Modulation is used to convert a signal from analog to digital or from digital to analog. PCM does not use compression and is used in compact disc, digital tapes and Windows. This type of modulation has two parameters, the sampling frequency and the number of bits per sample (usually, 8, 16 or 24 bits are used). PCM signals can be stored in Waveform file (*.wav). PCM (Pulse Code Modulation) permite convertir una señal de analógica a digital o de digital a analógica. PCM no posee compresión de datos y es usada en discos compactos, tapes digitales y en Windows. Esta modulación tiene dos parámetros, la frecuencia de muestreo y el número de bits por muestra (usualmente es de 8, 16 o 24 bits). Las señales de PCM pueden almacenarse un archivo Waveform (*.wav). |
Sampling Frequency |
| The sampling frequency determines the maximum frequency of the signal that we would like to convert to digital. Particularly, the sampling frequency must be at least twice the highest frequency of the signal. This minimum value is called the Nyquist Frequency in honor to Harry Nyquist (1930). La frecuencia de muestreo determina la máxima frecuencia de la señal que se desea convertir a señal digital. En particular, la frecuencia de muestreo debe ser al menos dos veces la frecuencia más alta de la señal. Esta frecuencia es conocida como la frecuencia Nyquist en honor a Harry Nyquist (1930). |
| Tip |
| When a signal is converted to digital using a sampling frequency that is lower than the Nyquist frequency, the signal will be distorted due to frequency overlap. To eliminate or reduce this overlap, a low pass filter must be placed at the input of the ADC. Cuando una señal es muestreada por debajo de la frecuencia de Nyquist, la señal resultante será distorsionada por traslape de frecuencias. Para evitar el traslape, se coloca un filtro pasa bajas en la entrada del ADC. |
| Problem 1 |
| Indicate whether the following statement is true or false: If the sampling frequency increases, then the quality of the stored signal improves. However, there is a point when no improvement is observed even though the sampling frequency increases because the resolution of the signal is over the resolution of the human ear. Diga si es verdadero o falso: Si la frecuencia de muestreo se aumenta, entonces se mejora la calidad de la señal almacenada. Sin embargo, existe un punto donde no hay mejora en el sonido cuando se aumenta la frecuencia de muestreo ya que esta resolución está por encima del oído humano. |
| Problem 2 |
| Indicate when it is convenient to use 8 bits per sample and when 16 bits per sample when a signal is converted from analog to digital. Indique cuando se deben usar 8 bits por muestra y cuando 16 bits pro muestra cuando se convierte una señal de analógico a digital. |
| Problem 3 |
| Computer how many Megabytes are required to store one hour of stereo music using the format of the standard CD. Remember that one Kbyte is equal to 1024 bytes, and one Megabyte is equal to 1024 Kbytes. Calcule cuantos Megabytes se requieren para almacenar una hora de música estéreo usando el formato estándar de los discos compactos comerciales. Recuerde que un Kbyte es igual a 1024 bytes y que un Megabyte es igual a 1024 Kbytes. |
Data Buffer |
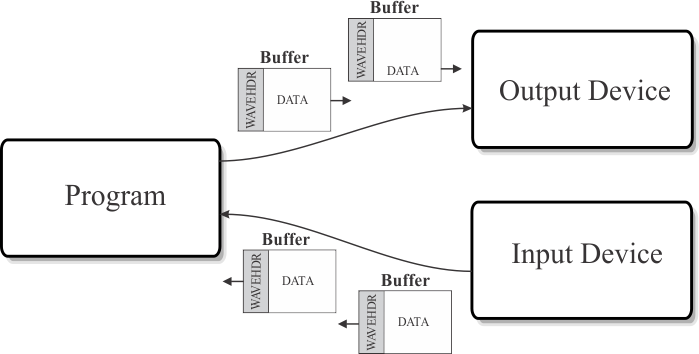
| A data buffer allows moving data between the program and the output or input device. The buffer has a header (WAVEHDR) and the data which is composed of an array of bytes as shown in the figure. Un buffer de datos permite mover datos entre el programa y un dispositivo de entrada o salida. El buffer está formado por un encabezado que es una variable del tipo WAVEHDR y los datos que están formados por un arreglo de bytes como se muestra en la figura. |
Digital to Analog Converter (DAC) in Microsoft Windows |
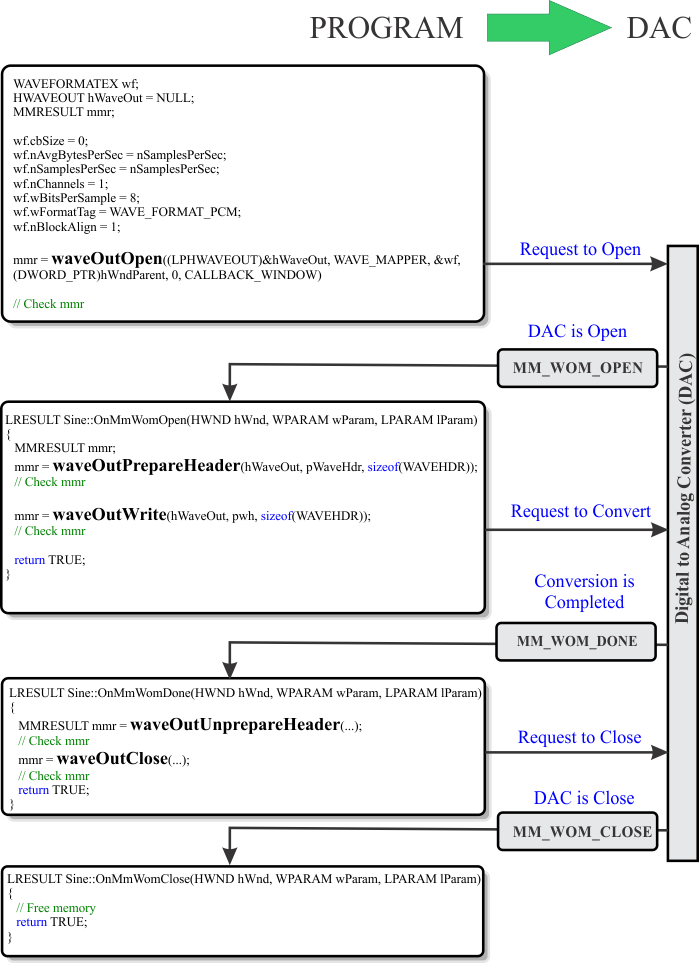
| Because the output of data is asynchronous, the sound APIS do not block program execution. Thus, communication between the program and the DAC is performed using messages as shown in the figure. Wintempla provide the Mm::Dac class to simplify the manipulation of the DAC. Debido a que la salida y captura de datos es asíncrona, las APIS de sonido no bloquean la ejecución del programa. Así, la comunicación entre el programa y el dispositivo de salida es a través de mensajes como se muestra en la figura. Wintempla proporciona la clase Mm::Dac para simplificar la manipulación del DAC. |
Analog to Digital Converter (ADC) in Microsoft Windows |
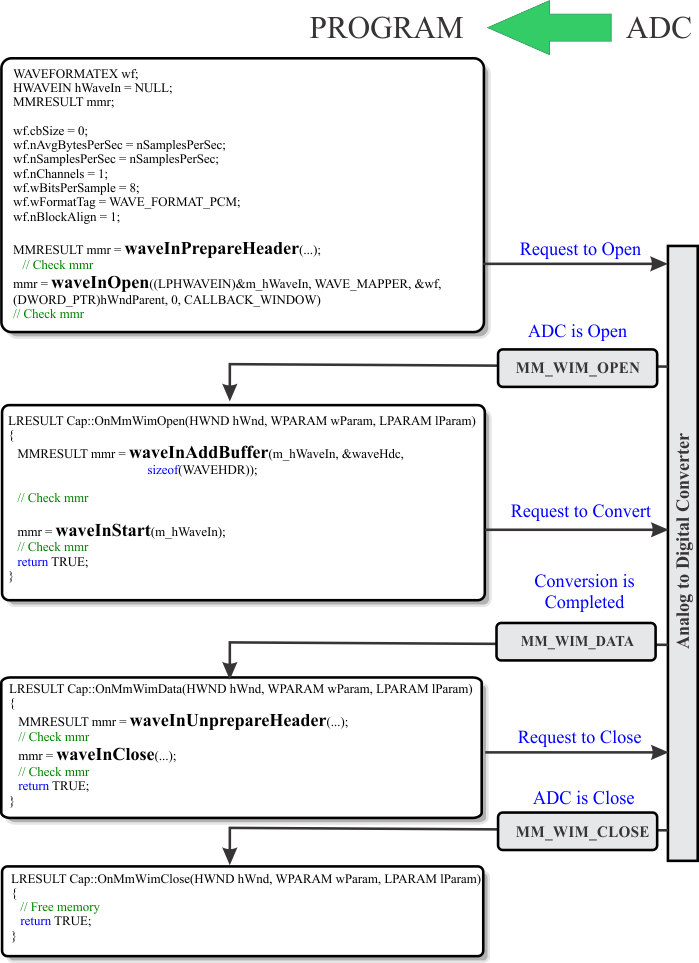
| Communication between the program and the ADC is performed using messages as shown in the figure. Wintempla provide the Mm::Adc class to simplify the manipulation of the ADC. La comunicación entre el programa y el dispositivo de entrada es a través de mensajes como se muestra en la figura. Wintempla proporciona la clase Mm::Adc para simplificar la manipulación del ADC. |
| Problem 4 |
| Create a Wintempla dialog application called FilePlayer to play a wave file. Cree una aplicación de diálogo de Wintempla llamada FilePlayer para reproducir un archivo wave. |
| Step A |
| Edit the stdafx.h file, remove the comments as shown to include the libraries to use the Digital to Analog Converter (DAC) and the Analog to Digital Converter (ADC) . Edite el archivo stdafx.h remueve los comentarios como se muestra para incluir las librerías para usar el Convertidor de Digital a Analógico (DAC) y el Convertidor de Analógico a Digital (ADC). |
| stdafx.h |
| // stdafx.h : include file for standard system include files, . . . //_________________________________________ MIDI, Audio Card DAC's and ADC's (or GDI Game for timers) #define WIN_DAC_ADC_SUPPORT . . . |
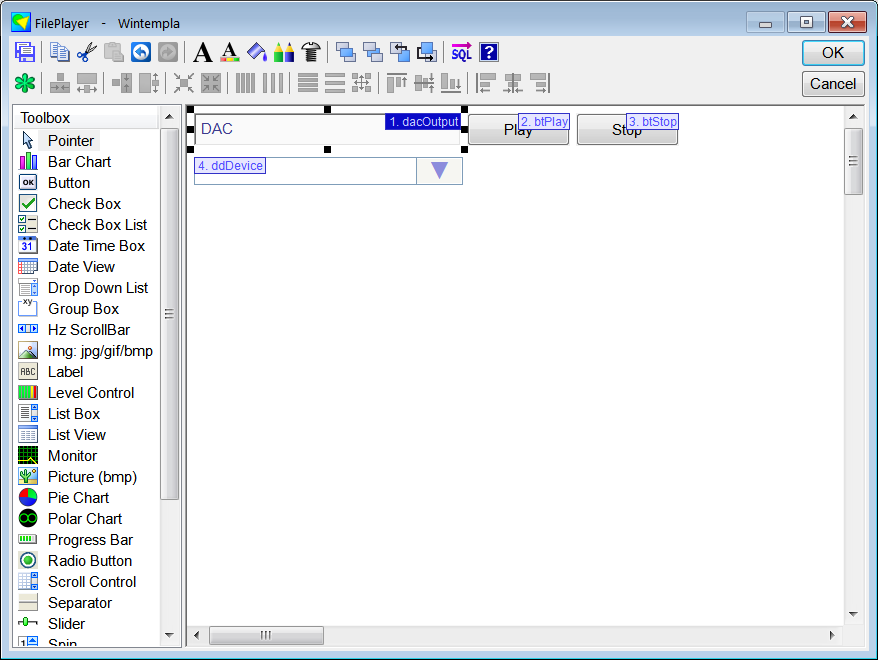
| Step B |
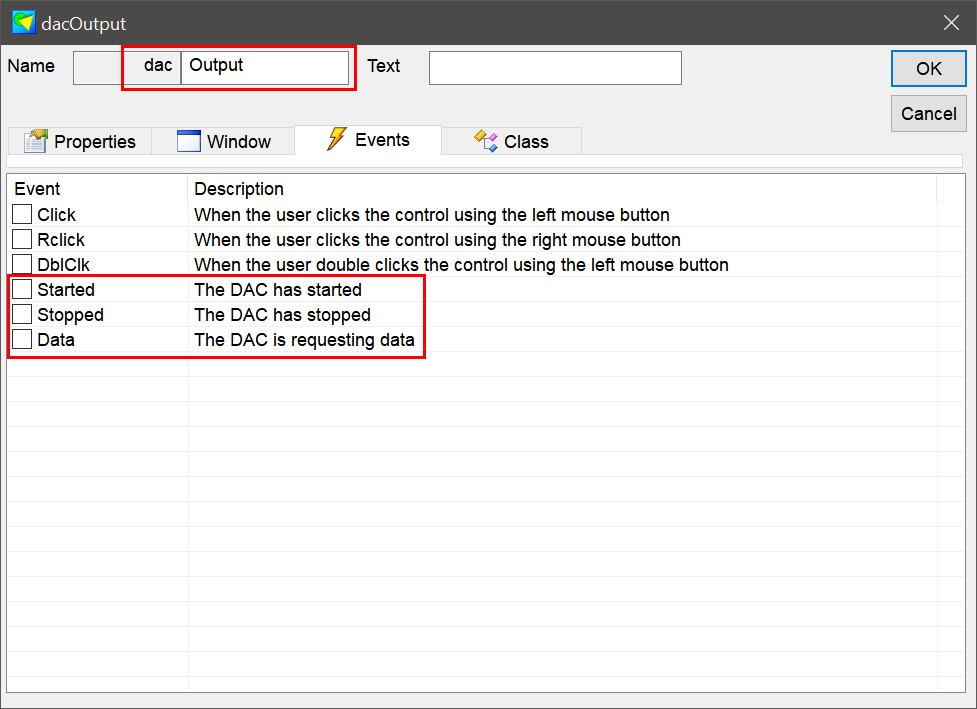
| Use Wintempla to insert a Digital to Analog Converter (DAC). Once Wintempla is open, click the Show All Controls in Toolbox to show all controls. Set the name to dacOutput. In the Events tab, be sure all events are unselected. Insert a button to Play and another one to Stop as shown. Insert a Drop Down List to select the output device. Use Wintempla para inserte un Digital to Analog Converter (DAC). Una vez que Wintempla se abre, haga clic en Show All Controls in Toolbox para mostrar todos los controles. Fije el nombre a dacOutput. En la pestaña de eventos, asegúrese que todos los eventos están deseleccionados. Inserte un botón para Reproducir y otro para Detener como se muestra. Inserte una Drop Down List para seleccionar el dispositivo de salida. |
| Step C |
| Edit the FilePlayer.h file and the FilePlayer.cpp file to implement the three functions of the Mm::IAudioOut interface (Observe the the FilePlayer class is derived from Mm::IAudioOut). Remember that an interface is used to pass a set of functions to another function or another object. Edite los archivos FilePlayer.h y FilePlayer.cpp para implementar las tres funciones de la interface Mm::IAudioOut (Observa que la clase FilePlayer se deriva de Mm::IAudioOut). Recuerde que una interface es usada para pasar un conjunto de funciones a otra función u objeto. |
| FilePlayer.h |
| #pragma once //______________________________________ FilePlayer.h #include "Resource.h" class FilePlayer: public Win::Dialog, public Mm::IAudioOut { public: FilePlayer() { } ~FilePlayer() { } Mm::WaveFile waveFile; //______________________________________________________________ Mm::IAudioOut void AudioOutStarted(unsigned int sampFreqHz, unsigned int numChannels, unsigned int bitsResolution); void AudioOutData(unsigned int sampFreqHz, unsigned int numChannels, unsigned int bitsResolution, WAVEHDR* waveHdr); void AudioOutStopped(); . . . }; |
| FilePlayer.cpp |
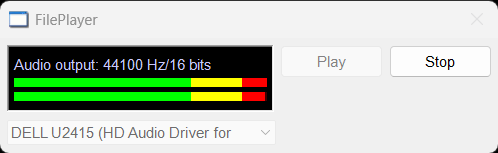
| . . . void FilePlayer::Window_Open(Win::Event& e) { btStop.Enabled = false; //________________________________________________________ ddDevice const int count = ::waveOutGetNumDevs(); WAVEOUTCAPS woc; const int wsize= sizeof(WAVEOUTCAPS); for (int i = 0; i < count; i++) { if (::waveOutGetDevCaps(i, &woc, wsize) == MMSYSERR_NOERROR) { ddDevice.Items.Add(woc.szPname, i); } } ddDevice.SelectedIndex = 0; } void FilePlayer::btPlay_Click(Win::Event& e) { //________________________________________________________ 1. Prompt to the user to get the filename Win::FileDlg dlg; dlg.Clear(); dlg.SetFilter(L"Wave files (*.wav)\0*.wav\0\0", 0, L"wav"); if (dlg.BeginDialog(hWnd, L"Open", false) != TRUE) return; //________________________________________________________ 2. Get the Device ID LPARAM deviceID = WAVE_MAPPER; ddDevice.GetSelectedData(deviceID); //________________________________________________________ 3. Open the Wave File const wchar_t* error = waveFile.OpenForReading(dlg.GetFileNameFullPath()); if (error != NULL) { this->MessageBox(error, L"FilePlayer", MB_OK | MB_ICONERROR); return; } //________________________________________________________ 4. Start the DAC error = dacOutput.Start((unsigned int)deviceID, waveFile.GetSampFreqHz(), waveFile.GetNumChannels(), waveFile.GetBitsResolution(), 16384, this); if (error != NULL) { this->MessageBox(error, L"FilePlayer", MB_OK | MB_ICONERROR); return; } } void FilePlayer::btStop_Click(Win::Event& e) { dacOutput.Stop(); } void FilePlayer::AudioOutStarted(unsigned int sampFreqHz, unsigned int numChannels, unsigned int bitsResolution) { btPlay.Enabled = false; btStop.Enabled = true; ddDevice.Enabled = false; EnableCloseButton(false); } void FilePlayer::AudioOutData(unsigned int sampFreqHz, unsigned int numChannels, unsigned int bitsResolution, WAVEHDR* waveHdr) { waveHdr->dwBytesRecorded = waveFile.ReadData(waveHdr->lpData, waveHdr->dwBufferLength); //Sys::Sample16* data = (Sys::Sample16*)(waveHdr->lpData); //const int bufferSize = waveHdr->dwBufferLength; //const int sampleCount = 8*bufferSize/(numChannels*bitsResolution); //for (int i = 0; i < sampleCount; i++) //{ // data[i].channel_1; // data[i].channel_2; //} } void FilePlayer::AudioOutStopped() { btPlay.Enabled = true; btStop.Enabled = false; ddDevice.Enabled = true; waveFile.Close(); EnableCloseButton(true); } |
| Problem 5 |
| Create a Wintempla dialog application called FileRecorder to record sound from the microphone and create a wave file. Cree una aplicación de diálogo de Wintempla llamada FileRecorder para grabar un sonido desde el micrófono y crear un archivo wave. |
| Step A |
| Edit the stdafx.h file, remove the comments as shown to include the libraries to use the Digital to Analog Converter (DAC) and the Analog to Digital Converter (ADC) . Edite el archivo stdafx.h remueve los comentarios como se muestra para incluir las librerías para usar el Convertidor de Digital a Analógico (DAC) y el Convertidor de Analógico a Digital (ADC). |
| stdafx.h |
| // stdafx.h : include file for standard system include files, . . . //_________________________________________ MIDI, Audio Card DAC's and ADC's (or GDI Game for timers) #define WIN_DAC_ADC_SUPPORT . . . |
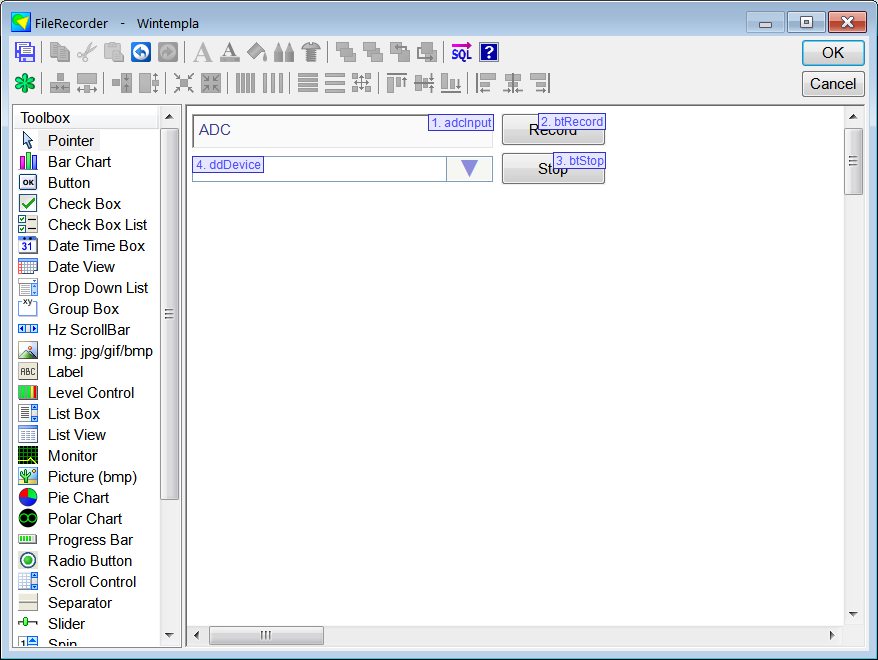
| Step B |
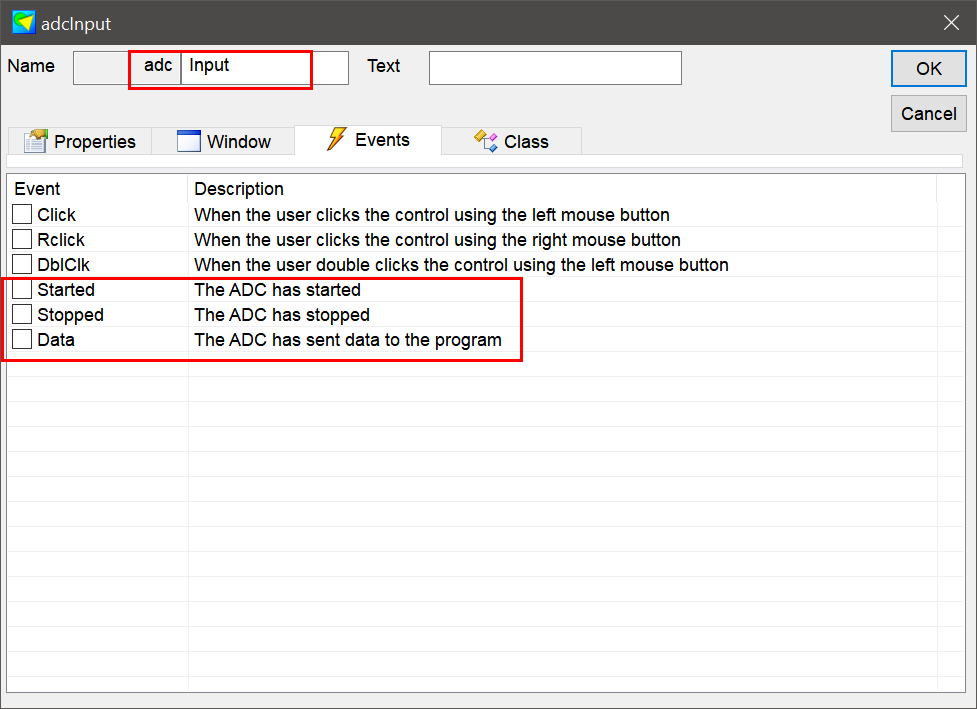
| Use Wintempla to insert a Analog to Digital Converter (ADC). Once Wintempla is open, click the Show All Controls in Toolbox to show all controls. Set the name to adcInput. In the Events tab, be sure all events are unselected. Insert a button to Record and another one to Stop as shown. Additionally, insert a drop down list to select the input device. Use Wintempla para insertar un Analog to Digital Converter (ADC). Una vez que Wintempla se abre, haga clic en Show All Controls in Toolbox para mostrar todos los controles. Fije el nombre a adcInput. En la pestaña de eventos, asegúrese de deseleccionar todos los eventos. Inserte un botón para Grabar y otro para Detener como se muestra. Adicionalmente, inserte una lista desplegable para seleccionar el dispositivo de entrada. |
| Step C |
| Edit the FileRecorder.h file and the FileRecorder.cpp file to implement the three functions of the Mm::IAudioIn interface (observe that the FileRecorder class is derived from Mm::IAudioIn). Remember that an interface is used to pass a set of functions to another function or another object. Edite los archivos FileRecorder.h y FileRecorder.cpp para implementar las tres funciones de la interface Mm::IAudioIn (observa que la clase FileRecorder se deriva de Mm::IAudioIn). Recuerde que una interface es usada para pasar un conjunto de funciones a otra función u objeto. |
| FileRecorder.h |
| #pragma once //______________________________________ FileRecorder.h #include "Resource.h" class FileRecorder: public Win::Dialog, public Mm::IAudioIn { public: FileRecorder() { } ~FileRecorder() { } wstring filename; Mm::WaveFile waveFile; //______________________________________________________________ Mm::IAudioIn void AudioInStarted(unsigned int sampFreqHz, unsigned int numChannels, unsigned int bitsResolution); void AudioInData(unsigned int sampFreqHz, unsigned int numChannels, unsigned int bitsResolution, WAVEHDR* waveHdr); void AudioInStopped(); protected: . . . }; |
| FileRecorder.cpp |
| . . . void FileRecorder::Window_Open(Win::Event& e) { btStop.Enabled = false; //________________________________________________________ ddDevice const int count = ::waveInGetNumDevs(); WAVEINCAPS wic; const int wsize= sizeof(WAVEINCAPS); for (int i = 0; i < count; i++) { if (::waveInGetDevCaps(i, &wic, wsize) == MMSYSERR_NOERROR) { ddDevice.Items.Add(wic.szPname, i); } } ddDevice.SelectedIndex = 0; } void FileRecorder::btRecord_Click(Win::Event& e) { //________________________________________________________ 1. Prompt to the user to get the filename Win::FileDlg dlg; dlg.Clear(); dlg.SetFilter(L"Wave files (*.wav)\0*.wav\0\0", 0, L"wav"); if (dlg.BeginDialog(hWnd, L"Save", true) != TRUE) return; //________________________________________________________ 2. Get the Device ID LPARAM deviceID = WAVE_MAPPER; ddDevice.GetSelectedData(deviceID); //________________________________________________________ 3. Open the Wave File const wchar_t* error = waveFile.OpenForWritting(44100, 2, 16, dlg.GetFileNameFullPath()); if (error != NULL) { this->MessageBox(error, L"FileRecorder", MB_OK | MB_ICONERROR); return; } //________________________________________________________ 4. Start the DAC error = adcInput.Start((unsigned int)deviceID, waveFile.GetSampFreqHz(), waveFile.GetNumChannels(), waveFile.GetBitsResolution(), 16384, this); if (error != NULL) { this->MessageBox(error, L"FileRecorder", MB_OK | MB_ICONERROR); return; } } void FileRecorder::btStop_Click(Win::Event& e) { adcInput.Stop(); } void FileRecorder::AudioInStarted(unsigned int sampFreqHz, unsigned int numChannels, unsigned int bitsResolution) { btRecord.Enabled = false; btStop.Enabled = true; EnableCloseButton(false); } void FileRecorder::AudioInData(unsigned int sampFreqHz, unsigned int numChannels, unsigned int bitsResolution, WAVEHDR* waveHdr) { waveFile.WriteData(waveHdr->lpData, waveHdr->dwBytesRecorded); } void FileRecorder::AudioInStopped() { btRecord.Enabled = true; btStop.Enabled = false; waveFile.Close(); EnableCloseButton(true); } |
